


I rate this quirky. To see our rating key, look at the right hand sidebar.

(In
the photos you might see me pin felt together with safety pins, but
that's just because at the time I couldn't find my pins- you can just
use regular sewing pins)
Materials: - Sewing Machine
- Poly- Fil (just stuffing)
- Ruler
- Scissors
- 11* 8 1/2 Paper
- Pencil
- Pins
- Felt:
- 5-6 pieces of red
- 2 pieces of white
- 2 pieces of gray
- 1 piece of black
- Embroidery floss:
-white
-gray
-black
-red
- Red spool of thread
- Time! Time! Time!

Tip:
You can choose whether you want an old fashioned bus or a more modern,
flat nose bus. I highly suggest choosing a flat nose (it's easier), but it's up to
you to choose whether or not you are up for the challenge of figuring out my instructions for an old fashioned one. If right now
you are deciding to make an old fashion one, please read steps 24- 29
to make sure you can figure out my not-so-greatly-written instructions.
Step
1: On paper draw out how you want the front of the side of the bus to
look. If you want it to be a flat nosed bus then you only have to draw a
rectangle. If you want it to be old fashioned like mine then a square
will be taken out of the front. Also make a place for the wheels to
go. Make sure it's the right size, too, because you will be using this
as a template to cut out the felt.

Step 2: Once it looks like how you like it make sure you have allowed a 1/4 inch seam allowance and then cut it out.
Step
3: Make templates for all the other sides of the bus to match
according to shape and size. Make sure that the measurements are all
right because that really maters later on. Allow a 1/4 inch for seam
allowance. No matter what kind of bus you are making only make a
rectangle for the front. If you are making an old fashioned bus it is
easier to make all of the squares for the front later. Cut out all of
the templates.
Step 4: As you are making the templates label them so that you don't get them mixed up.

Step
5: Pin the templates to the red felt pieces and then cut them out.
Try to use as little felt as you can by trying to fit more than one
template on one piece of felt. This will minimize the risk of running
out of red felt. Take off all of the pins but one so that the felt is
still labeled with paper.

Step
6: Unpin the paper from the front of the side, back of the side, and
top. With your machine and red thread sew the top and front of the side
together right sides together. Then sew the top and back of the side
together.


Step 7: Take the very back piece and just sew the top to the top of the bus, right sides together.

Now
is when we start to get creative in customizing the bus. Feel free to
change it a little bit. Maybe you want another window, or you don't
like the white strip, or you want the door in the front instead of the
back?
Step
8: Cut a strip of white felt the length of the front of the side of
the bus. Make it as thin as you want. Lay it across the front of the
side of the bus so that it lays right over the square gap. If you have a
flat nose bus put it a little above the middle.

Step 9: Pin it down.
Step
10: Thread your needle with white embroidery floss. I used 2 out of
the 6 strands, but you can choose how thick you want it. Then knot the
end.
Step
11: Hand stitch the white strip to the felt by coming up at the bottom
of the strip and going back down at the top. Stitch the whole thing
down. I started in the middle for no reason, but you can start at the
left and go to the right.


Step 12: When you've got all the way across knot off.
Step
13: Now take a gray piece of felt and cut out a rectangle for the door
on the front of the side. It should be tall enough to reach from the
bottom to the white strip, and wide enough to reach from the wheel to
the back end. You can make it a little bigger than necessary and then
cut the extra off once you've sewn the door on. Pin it to the bus.
Step
14: Thread your needle with gray embroidery floss. Again, I used 2
strands, but you can chose. Use the same stitch you used to sew the
white strip on to hand stitch the door on. Stitch the part touching the
white strip and the inner side. You don't have to stitch the two outer
edges, but you can and it makes it a little easier later.
Step 15: Knot off when you are done.
Step
16: Cut 2 more white strips for the back of the side and back piece.
Pin them to the felt and make sure they will line up with the white
strip on the front of the side.
Step 17: Hand stitch them on the same way you did before.
Step
18: Cut out another gray rectangle for the other half of the door on
the back. It should be about the same width across as the first one,
and should reach from the white strip to the bottom. Hand stitch it on
the same way you did the last one.

Step 19: Pin the front of the side and the back right sides together and make sure that the white strips line up.
Step 20: With your sewing machine sew the front of the side and back together.
Step 21: Repeat steps 19 and 20 with the back of the side and back.


Step 22: Take the front piece and pin the top of it to the top of the bus.
Step 23: With the machine sew it on, and then unpin it.
Step
24: If you are doing a flat nosed bus skip this step: cut a square in
the front that matches up with the square on the front of the side.
Step 25: Cut out, pin, and hand stitch on a white strip that lines up with the other white strips

Step 26: Pin and sew the back of the side and the front together, making sure that the white lines match up.

If you are making a flat nose bus skip to step # 30. If you are making an old fashion bus read on.
Step
27: Measure how long the square is on the front of the side, and add
on 1/2 an inch for 2, 1/4 inch seem allowances. On a red piece of felt
cut out a square that is that long and as tall as the gap.
Step 28: Pin and sew it on in the spot shown below. It will be pushed back 90 degrees.

Step 29: Using the same sort of method, cut out and sew on squares to make the square indent.


By now the front should look like this:


Step 30: Cut out a square with rounded edges out of white felt that you think is about window size.

Step 31: Set it on the front of the side to see if it is the right size. You should be able to fit 5 windows on the top.

Step 32: Once you know the window is the right size pin it to a square of white felt.

Step 33: Use the first window as a template to cut out the second window.
Step
34: Keep cutting out windows until you have 24 windows in all if you
are making an old fashion, and 25 if you are making a flat nose:
- 8 for the front of the side
- 10 for the back of the side
- 3 for the back
- 1 for the front of an old fashion, and 2 for the front of a flat nose
- 2 extras, just in case

Step
35: Round one of the corners off of one of the windows. If you don't
understand, look at the far right window in the picture for step # 36
Step 36: Pin the top 5 windows on.
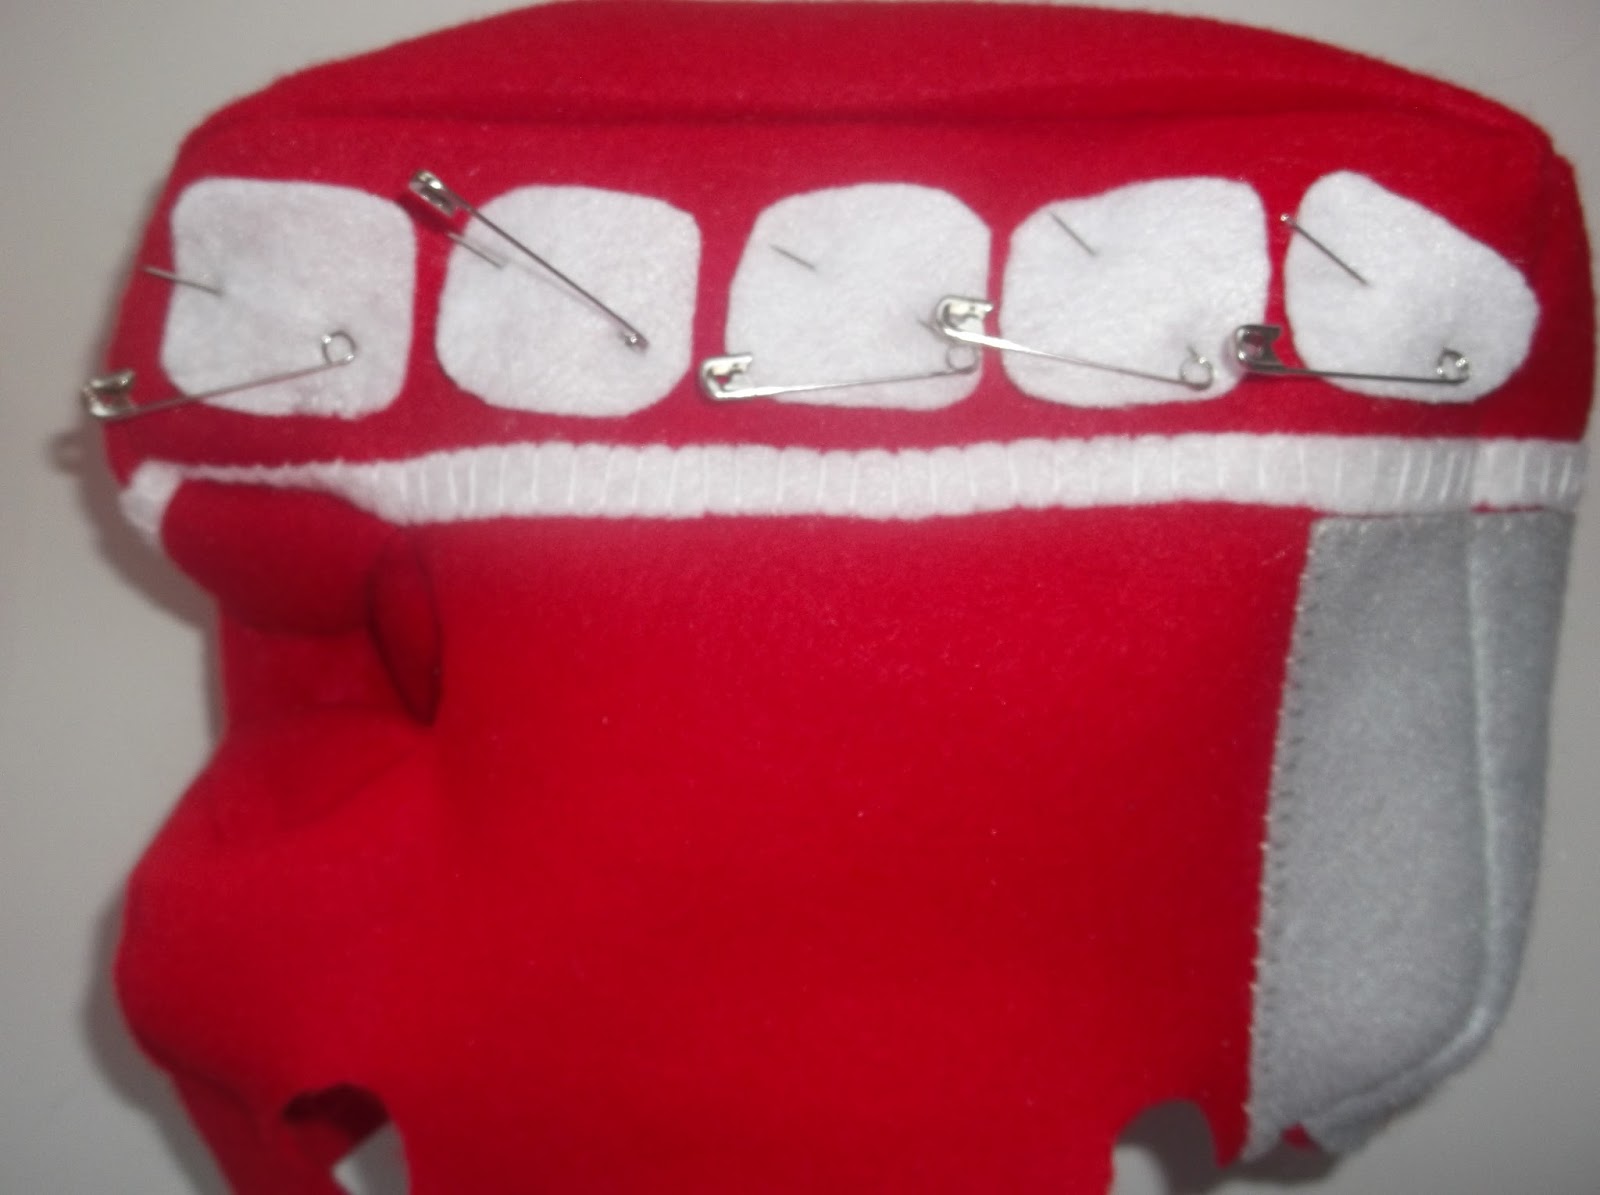
Step 37: With the same stitch that you used to stitch the door and white strip on- or the blanket stitch- hand stitch a window on. (Sorry for the bad photo)

Step 38: Do the same with the other top 4 windows.

Step 39: Stitch the bottom 3 windows on.

Step 40: Pin 3 windows on the back.

Step 41: Stitch them on.
Step 42: Pin and stitch the front window(s) on. (Sorry again for the bad photo)
Step 43: Pin and stitch the 10 back windows on.

Step 44: Cut a rectangle out of black felt and then pin it to the front. (Look at the photo for #45)
Step 45: Using the blanket stitch, stitch it on with black embroidery floss.

Step 46: Choose what you want to embroider. It could be your name, the year you went to London, a famous street name such as King's Cross, or anything else! Using white embroidery floss, stitch it on using the split stitch. If you don't know what the split stitch is, this random video from YouTube can teach you.

Step 47: Cut out a circle that is a little bigger than your wheel space in your felt.

Step 49: Repeat step 48 with the three other wheels.
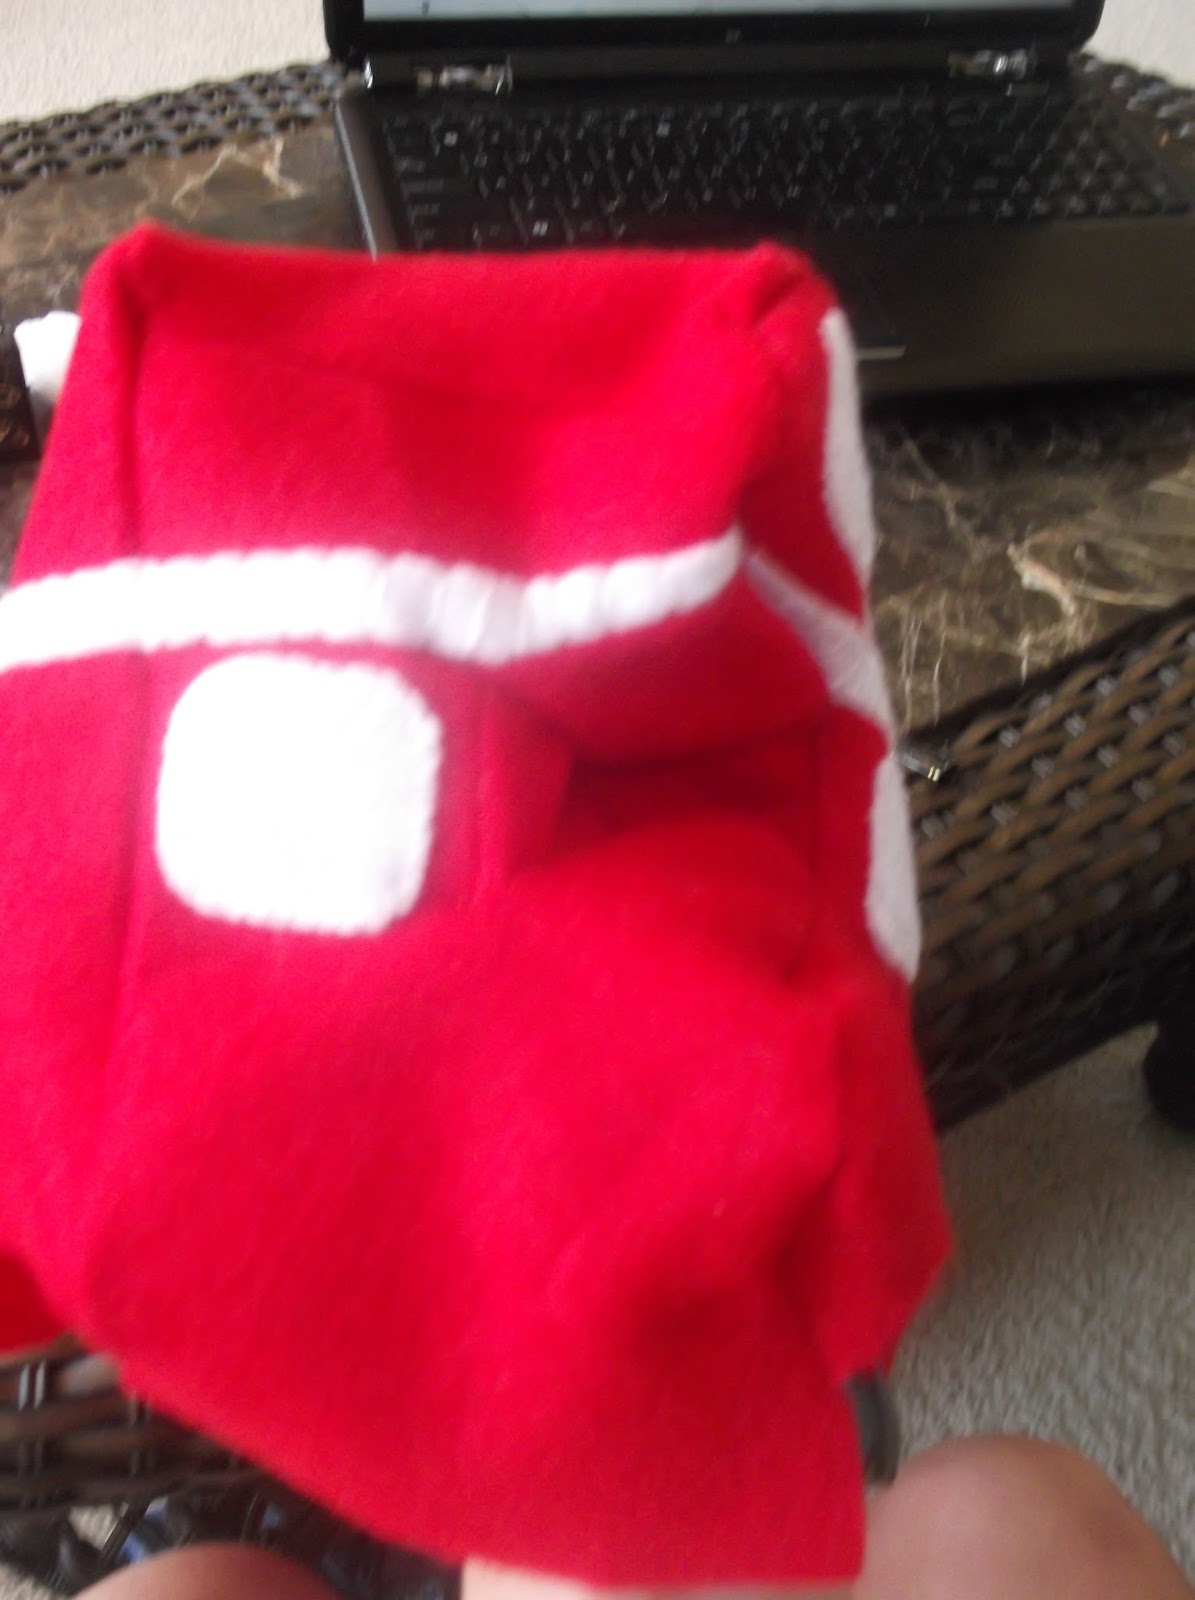
Step 50: Pin the back of the bottom piece to the bottom of the back piece. (Does that make sense? Look at the picture of Step 51.)
Step 51: With your machine sew the two pieces together.

Step 52: Pin and sew with the machine the front of the side and bottom together, right sides together.
Step 53: Pin and sew with the machine the front and bottom together, right sides together.
Step 54: Pin and sew the back of the side and bottom together half way, right sides together, leaving half unsewn.
Step 55: You're so close!!! Flip the pillow right-side-out and stuff it with Poly- Fil: stuffed as much as you can.
Step 56: With red embroidery floss stitch the bottom up.
Step
57: Just kidding... there is no step 57!! You're done!!!!!!!!! Now
go and get yourself a big bowl of ice cream! Or go surf Pinterest for
30 minutes without feeling guilty! Just do something to congratulate
yourself because if you made it through that long and at times probably
frustrating project and my very confusing and poorly-written tutorial
then you deserve it! (See? Even that sentence was confusing! Wow I
really need to work on my tutorial-writing skills! Anyhoo...)
Inspired by: My little brother Noah
Where I stated planning out this project:
This picture:

Difficulty Rating:

See very bottom of page
No comments:
Post a Comment